Memo
The Memo control uses MarkDown as its formatting language. The control contains two panes: the lower one allows you to edit your text using Markdown, and the upper displays the resulting formatted text.
The tables immediately below give a brief description of the Markdown syntax. This is followed by a more detailed description, largely taken from the website of John Gruber, the developer of Markdown.

Markdown Syntax
Markdown paragraphs are simply one or more lines of consecutive text, separated by one or more blank lines. They should not be indented with spaces or tabs. Most formatting operations can be easily accomplished using the features described below. If that is not sufficient, HTML tags may be used within Markdown, but there is generally little need to do so. This document is itself written in Markdown, with no additional tags.
Headers
Markdown headers are created by placing 1-6 hash characters at the start of the line, corresponding to header levels 1-6. For example:
# This is an H1

## This is an H2

###### This is an H6
These will appear as:
This is an H1
This is an H2
This is an H6
Emphasis
Markdown treats asterisks (*) and underscores (_) as indicators of
emphasis. Text wrapped with one * or _ will be wrapped with an
HTML <em> tag; double *’s or _’s will be wrapped with an HTML
<strong> tag. E.g., this input:
*single asterisks* will appear as single asterisks
_single underscores_ will appear as single underscores
**double asterisks** will appear as double asterisks
__double underscores__ will appear as double underscores
***triple_asterisks*** will appear as triple_asterisks
You can use whichever style you prefer; the lone restriction is that the same character must be used to open and close an emphasis span.
Emphasis can be used in the middle of a word:
x*y*z will appear as x*y*z.
But if you surround an * or _ with spaces, it’ll be treated as a
literal asterisk or underscore.
To produce a literal asterisk or underscore at a position where it would otherwise be used as an emphasis delimiter, you can backslash escape it:
\*this text is surrounded by literal asterisks\*
produces *this text is surrounded by literal asterisks*
Lists
Markdown supports ordered (numbered) and unordered (bulleted) lists.
Unordered lists use asterisks, pluses, and hyphens – interchangably – as list markers:
*   Red
*   Green
*   Blue
is equivalent to:
+   Red
+   Green
+   Blue
and:
-   Red
-   Green
-   Blue
With any of these, the results will appear as:
- Red
- Green
- Blue
Ordered lists use numbers followed by periods:
1.  Bird
2.  McHale
3.  Parish
It’s important to note that the actual numbers you use to mark the list have no effect on the output Markdown produces. If you instead wrote the list in Markdown like this:
1.  Bird
1.  McHale
1.  Parish
or even:
3. Bird
1. McHale
8. Parish
All of these will produce:
- Bird
- McHale
- Parish
The point is, if you want to, you can use ordinal numbers in your ordered Markdown lists, so that the numbers in your source match the numbers in your published document. But if you want to be lazy, you don’t have to. If you do use lazy list numbering, however, you should still start the list with the number 1. At some point in the future, Markdown may support starting ordered lists at an arbitrary number.
List markers typically start at the left margin, but may be indented by up to three spaces. List markers must be followed by one or more spaces or a tab. List items may consist of multiple paragraphs. Each subsequent paragraph in a list item must be indented by either 4 spaces or one tab:
1.  This is a list item with two paragraphs. Lorem ipsum dolor
    sit amet, consectetuer adipiscing elit. Aliquam hendrerit
    mi posuere lectus.

    Vestibulum enim wisi, viverra nec, fringilla in, laoreet
    vitae, risus. Donec sit amet nisl. Aliquam semper ipsum
    sit amet velit.

2.  Suspendisse id sem consectetuer libero luctus adipiscing.
will produce:
This is a list item with two paragraphs. Lorem ipsum dolor sit amet, consectetuer adipiscing elit. Aliquam hendrerit mi posuere lectus.
Vestibulum enim wisi, viverra nec, fringilla in, laoreet vitae, risus. Donec sit amet nisl. Aliquam semper ipsum sit amet velit.
Suspendisse id sem consectetuer libero luctus adipiscing.
It’s worth noting that it’s possible to trigger an ordered list by accident, by writing something like this:
1986. What a great season.
In other words, a number-period-space sequence at the beginning of a line. To avoid this, you can backslash-escape the period:
1986\. What a great season.
Code Blocks
Pre-formatted code blocks are used for writing about programming or markup source code. Rather than forming normal paragraphs, the lines of a code block are interpreted literally. To produce a code block in Markdown, simply indent every line of the block by at least 4 spaces or 1 tab. For example, given this input:
This is a normal paragraph:

    This is a code block.
    public string LabelText
    {
        get { return label1.Text; }
        set { label1.Text = value; }
    }
Markdown will generate:
This is a normal paragraph:
This is a code block.
public string LabelText
{
    get { return label1.Text; }
    set { label1.Text = value; }
}
One level of indentation – 4 spaces or 1 tab – is removed from each line of the code block.
A code block continues until it reaches a line that is not indented (or the end of the article).
Regular Markdown syntax is not processed within code blocks. E.g., asterisks are just literal asterisks within a code block. This means it’s also easy to use Markdown to write about Markdown’s own syntax.
If indenting every line by four spaces or a tab is inconvenient, an alternative is to use “fenced” code blocks. Use three tildes (~~~) on the lines before and after the code block.
~~~
public string LabelText
{
    get { return label1.Text; }
    set { label1.Text = value; }
}
~~~
produces
public string LabelText
{
    get { return label1.Text; }
    set { label1.Text = value; }
}
Block quotes
Markdown uses email-style > characters for blockquoting. If you’re
familiar with quoting passages of text in an email message, then you
know how to create a blockquote in Markdown. It looks best if you hard
wrap the text and put a > before every line:
> This is a blockquote with two paragraphs. Lorem ipsum dolor sit amet,
> consectetuer adipiscing elit. Aliquam hendrerit mi posuere lectus.
> Vestibulum enim wisi, viverra nec, fringilla in, laoreet vitae, risus.
>
> Donec sit amet nisl. Aliquam semper ipsum sit amet velit. Suspendisse
> id sem consectetuer libero luctus adipiscing.
to produce
This is a blockquote with two paragraphs. Lorem ipsum dolor sit amet, consectetuer adipiscing elit. Aliquam hendrerit mi posuere lectus. Vestibulum enim wisi, viverra nec, fringilla in, laoreet vitae, risus.
Donec sit amet nisl. Aliquam semper ipsum sit amet velit. Suspendisse id sem consectetuer libero luctus adipiscing.
Markdown allows you to be lazy and only put the > before the first
line of a hard-wrapped paragraph:
> This is a blockquote with two paragraphs. Lorem ipsum dolor sit amet,
consectetuer adipiscing elit. Aliquam hendrerit mi posuere lectus.
Vestibulum enim wisi, viverra nec, fringilla in, laoreet vitae, risus.

> Donec sit amet nisl. Aliquam semper ipsum sit amet velit. Suspendisse
id sem consectetuer libero luctus adipiscing.
Blockquotes can be nested (i.e. a blockquote-in-a-blockquote) by
adding additional levels of >:
> This is the first level of quoting.
>
> > This is nested blockquote.
>
> Back to the first level.
will produce
This is the first level of quoting.
This is nested blockquote.
Back to the first level.
Horizontal rules
You can produce a horizontal rule by placing three or more hyphens, asterisks, or underscores on a line by themselves. If you wish, you may use spaces between the hyphens or asterisks. Each of the following lines
* * *

***

*****

- - -

---------------------------------------
will generate:
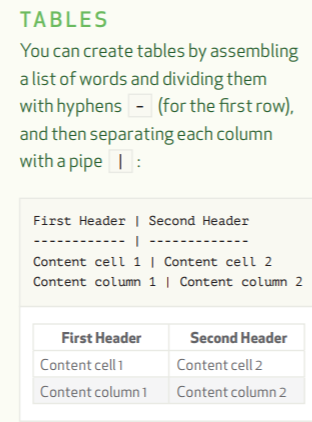
Tables
To add a table, use three or more hyphens (—) to create each column’s header, and use pipes (|) to separate each column. You can optionally add pipes on either end of the table.
| Syntax      | Description |
| ----------- | ----------- |
| Header      | Title       |
| Paragraph   | Text        |
The rendered output looks like this:
| Syntax | Description |
|---|---|
| Header | Title |
| Paragraph | Text |
Cell widths can vary, as shown below. The rendered output will look the same.
| Syntax | Description |
| --- | ----------- |
| Header | Title |
| Paragraph | Text |
You can align text in the columns to the left, right, or center by adding a colon (:) to the left, right, or on both side of the hyphens within the header row.
| Syntax      | Description | Test Text     |
| :---        |    :----:   |          ---: |
| Header      | Title       | Here's this   |
| Paragraph   | Text        | And more      |
The rendered output looks like this:
| Syntax | Description | Test Text |
|---|---|---|
| Header | Title | Here’s this |
| Paragraph | Text | And more |
You can format the text within tables. For example, you can add links, code (words or phrases in tick marks (`) only, not code blocks), and emphasis. You can’t add headings, blockquotes, lists, horizontal rules, images, or HTML tags.
Links
Markdown supports two style of links: inline and reference.
In both styles, the link text is delimited by [square brackets].
To create an inline link, use a set of regular parentheses immediately after the link text’s closing square bracket. Inside the parentheses, put the URL where you want the link to point, along with an optional title for the link, surrounded in quotes. For example:
This is [an example](http://example.com/ "Title") inline link.

[This link](http://example.net/) has no title attribute.
Will produce:
This is an example inline link.
This link has no title attribute.
If you’re referring to a local resource on the same server, you can use relative paths:
See my [About](/about/) page for details.
Reference-style links use a second set of square brackets, inside which you place a label of your choosing to identify the link:
This is [an example][id] reference-style link.
You can optionally use a space to separate the sets of brackets:
This is [an example] [id] reference-style link.
Then, anywhere in the document, you define your link label like this, on a line by itself:
[id]: http://example.com/ "Optional Title Here"
That is:
- Square brackets containing the link identifier (optionally indented from the left margin using up to three spaces);
- followed by a colon;
- followed by one or more spaces (or tabs);
- followed by the URL for the link;
- optionally followed by a title attribute for the link, enclosed in double or single quotes, or enclosed in parentheses.
The following three link definitions are equivalent:
[foo]: http://example.com/  "Optional Title Here"
[foo]: http://example.com/  'Optional Title Here'
[foo]: http://example.com/  (Optional Title Here)
You can put the title attribute on the next line and use extra spaces or tabs for padding, which tends to look better with longer URLs:
[id]: http://example.com/longish/path/to/resource/here
    "Optional Title Here"
Link definitions are only used for creating links during Markdown processing, and are stripped from your document in the HTML output.
Link definition names may consist of letters, numbers, spaces, and punctuation – but they are not case sensitive. E.g. these two links:
[link text][a]
[link text][A]
are equivalent.
The implicit link name shortcut allows you to omit the name of the link, in which case the link text itself is used as the name. Just use an empty set of square brackets – e.g., to link the word “Google” to the google.com web site, you could simply write:
[Google][]
And then define the link:
[Google]: http://google.com/
Because link names may contain spaces, this shortcut even works for multiple words in the link text:
Visit [Daring Fireball][] for more information.
And then define the link:
[Daring Fireball]: http://daringfireball.net/
Link definitions can be placed anywhere in your Markdown document. I tend to put them immediately after each paragraph in which they’re used, but if you want, you can put them all at the end of your document, sort of like footnotes.
Here’s an example of reference links in action:
I get 10 times more traffic from [Google][1] than from
[Yahoo][2] or [MSN][3].

  [1]: http://google.com/        "Google"
  [2]: http://search.yahoo.com/  "Yahoo Search"
  [3]: http://search.msn.com/    "MSN Search"
Using the implicit link name shortcut, you could instead write:
I get 10 times more traffic from [Google][] than from
[Yahoo][] or [MSN][].

  [google]: http://google.com/        "Google"
  [yahoo]:  http://search.yahoo.com/  "Yahoo Search"
  [msn]:    http://search.msn.com/    "MSN Search"
Both of the above examples will produce the following output:
I get 10 times more traffic from Google than from Yahoo or MSN.
For comparison, here is the same paragraph written using Markdown’s inline link style:
I get 10 times more traffic from [Google](http://google.com/ "Google")
than from [Yahoo](http://search.yahoo.com/ "Yahoo Search") or
[MSN](http://search.msn.com/ "MSN Search").
The point of reference-style links is not that they’re easier to write. The point is that with reference-style links, your document source is vastly more readable. Compare the above examples: using reference-style links, the paragraph itself is only 81 characters long; with inline-style links, it’s 176 characters; and as raw HTML, it’s 234 characters. In the raw HTML, there’s more markup than there is text.
With Markdown’s reference-style links, a source document much more closely resembles the final output, as rendered in a browser. By allowing you to move the markup-related metadata out of the paragraph, you can add links without interrupting the narrative flow of your prose.
Images
Admittedly, it’s fairly difficult to devise a “natural” syntax for placing images into a plain text document format. Markdown uses an image syntax that is intended to resemble the syntax for links, allowing for two styles: inline and reference.
Inline image syntax looks like this:


That is:
- An exclamation mark:
!; - followed by a set of square brackets, containing the
altattribute text for the image; - followed by a set of parentheses, containing the URL or path to the image, and an optional
titleattribute enclosed in double or single quotes.
Reference-style image syntax looks like this:
![Alt text][id]
Where “id” is the name of a defined image reference. Image references are defined using syntax identical to link references.
[id]: url/to/image "Optional title attribute"
As of this writing, Markdown has no syntax for specifying the
dimensions of an image; if this is important to you, you can simply
use regular HTML <img> tags.
Where do I put my Memo images?
Place these under the ApsimNG/Resources directory.
The markdown view searches in this location (among other locations) for images. The URL is simply the relative path from this location so if you put it directly under the ApsimNG/Resources directory it will be the name of the file including its extension, if its in a sub folder, then it will be subfolder/<image-name> where image name is the name of the file including the file extension e.g. 
Superscript
Text enclosed between caret (^) characters will be rendered as superscript.
super^script^
Subscript
Text enclosed between tilde (~) characters will be rendered as subscript.
sub~script~