SourceTree
SourceTree is only available on Windows and OSX. If you are using Linux, version control will need to be managed via the command line
Create GitHub account
The APSIM source code is located on GitHub so you will need to have a GitHub login if you want to contribute new features or modifications to the APSIM repository.
This document assumes that your APSIM Next Generation folder is C:\Work\ApsimX.
Fork the repository
If you plan to modify or add to the APSIM code/datasets, you will need to fork the repository. A fork creates a copy of the repository associated with your github account.
- Click on the fork link in the top right hand corner of the APSIM repository on GitHub
Clone ApsimX to your computer
To bring the source code from GitHub to your computer, you will need to clone the repository. We recommend you use a Git GUI client. We recommend SourceTree for this. Once you have SourceTree installed on your computer, goto File | Clone menu item.
Click the ‘Clone / New’ button in SourceTree and specify:
- Source Path / URL: https://github.com/APSIMInitiative/ApsimX
- Destination Path: C:\Work\ApsimX <- this is the folder on your computer
- Name: ApsimX <- This is the name that this respository will be known by
Once you click ‘Clone’, all files will be downloaded to your computer into the destination path that you specified above. SourceTree will create a tab for your new cloned repository.
Add a remote repository
You now need to create a link to your ApsimX fork that you created earlier.
- Click Repository | Repository Settings
- Click ‘Add’
- Remote name: hol353 <- Can be anything, but we recommend using the username of your GitHub account.
- URL / Path: https://github.com/hol353/ApsimX <- URL of your ApsimX fork
- Host Type: GitHub
- Username: hol353 <- GitHub user name
We suggest you name the remote repository the same as your GitHub user name, hence the need to enter it twice. The reason for linking to two repositories will become evident later. You ALWAYS pull from the ApsimX repository and push to your forked repository.
At this point, you have all source code. If you wish to compile the code yourself, see here. If you don’t wish to compile the code, you can run any of the examples/prototypes/test sets with the released version of apsim, but it will need to be up-to-date.
After you have made some changes to the code or test sets, you will need to commit your changes.
Initial setup
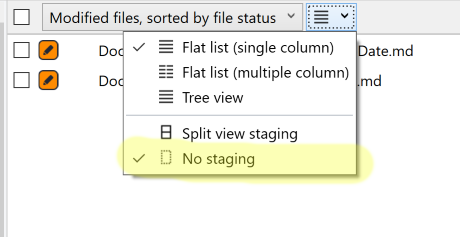
The first time you use SourceTree we recommend you turn staging off.
- Click ‘Commit’
- Choose ‘No staging’ in the drop down beside the ‘Modified files…’ drop down
Commit
If you have files that you have added or modified, you can commit them to git. This process of adding commits keeps track of your progress as you work on files in APSIM.
Commits also create a transparent history of your work that others can follow to understand what you’ve done and why. Each commit has an associated commit message, which is a description explaining why a particular change was made. Furthermore, each commit is considered a separate unit of change. This lets you roll back changes if a bug is found, or if you decide to head in a different direction.
Commit messages are important, especially since Git tracks your changes and then displays them as commits once they’re pushed to the server. By writing clear commit messages, you can make it easier for other people to follow along and provide feedback.
Commits are local to your computer only until you do a push to a remote repository.

In the top left corner, SourceTree shows (by default) the files that you have modified but haven’t commited yet. If you have created new files that have never been commited they won’t be shown yet. To see these files, change the drop down box from ‘Modified files” to “Untracked”. Note that the .db files produced by APSIM simulations are ignored by git and should not be committed.
- You can then right click on the untracked files and select “Add” to tell git to start tracking them.
- If you don’t want to keep them, right click and select “Remove”. This will delete them from your folder
- Change the drop down back to “Modified files”
Clicking on a file will show you what you have changed. If you don’t want to keep the changes you have made, right click on the file and select ‘Discard’.
Tick the files you want to commit.
Finally, at the bottom type in a commit message, make sure ‘Push changes immediately…’ is unticked and then click Commit. At this point, your new commit is only on your computer and noone else can see it. You can commit files as many times as you wish.
NOTE: Before you bring your folder up to date, you need to commit or discard all files that you have added or modified. If you don’t do this you may get errors during the pull process outlined below.
Pull
To bring the current branch up to date you get the latest commits from the master branch in the MasterRepo repository. Click the pull button:
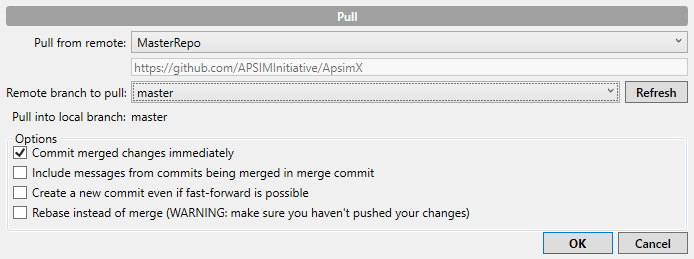
Ensure the remote is MasterRepo and the branch is master. Leave all other checkboxes alone. This will bring down the latest commits from the MasterRepo/master branch into your ‘current’ branch (the one in bold in SourceTree).
RECOMMENDATION: You should always bring your branch up to date at the beginning of a major piece of work. In addition, you should also do a pull regularly, at least weekly.
Push changes to a remote
Once you’re ready to share your commits with the wider APSIM community and have them merged into the master repository, you will need to push your commits to your forked remote repository (e.g. hol353). Doing a push won’t impact on other developers and won’t cause Jenkins to run the test suite. Pushing will allow other developers to pull from your branch on your repository so it is a good way to share what you are doing with others.
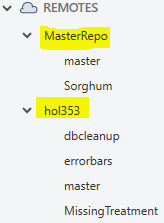
In this image there are two remote repositories, hol353 (a developers remote) and MasterRepo (the main APSIM repository). You should never push to the MasterRepo remote. Instead, you push to your remote repository - hol353 in this example. Click the push button.
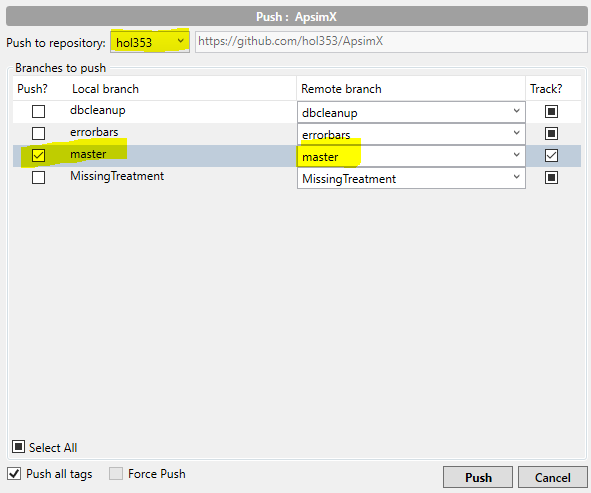
Always make sure the remote (highlighted in the above image) is your remote and not MasterRepo. You also need to tick the branch you want to push to your remote repository, in this case master.
Open a Pull Request
Pull Requests initiate discussion about your commits. They say to other developers that you are wanting a peer review of your changes.
You can open a Pull Request at any point during the development process: when you have little or no code but want to share some screenshots or general ideas, when you’re stuck and need help or advice, or when you’re ready for someone to review your work. By using GitHub’s @mention system in your Pull Request message, you can ask for feedback from specific people or teams, whether they’re down the hall or ten time zones away.
1. Peer review
Once a Pull Request has been opened, a developer will review your changes and may have questions or comments. Perhaps the coding style doesn’t match project guidelines, the change is missing unit tests, or maybe everything looks great. Pull Requests are designed to encourage and capture this type of conversation.
You can also continue to push to your branch in light of discussion and feedback about your commits. If someone comments that you forgot to do something or if there is a bug in the code, you can fix it in your branch and push up the change. GitHub will show your new commits and any additional feedback you may receive in the unified Pull Request view.
2. Jenkins build and run system
Jenkins will automatically run all pull requests and flag pass/fail with GitHub. If you have finished a piece of work then you need to state somewhere in the first comment box of the pull request:
Resolves #45
or
Working on #45
This will alert the administrators of the APSIM repository that the pull request fixes issue number 45 (or you are working on it). All merges to master must have an issue describing the piece of work. T
3. The APSIM Performance Testing site
The APSIM Performance Testing suite will also test your pull request, calculating statistics on all predicted / observed data found and check them against the ‘accepted’ statistics. This will also be reported back to your pull request.
Merging with the MasterRepo
If the pull request has been reviewed by a developer, the Jenkins build system passes and the APSIM Performance Testing system also passes, the administrators will then merge the pull request with the master branch of the main repository and close the issue (if you specified ‘resolves’). Once the issue is closed it should not be reopened.
After a Pull request that resolves an issue is authorised to be merged, the the automated upgrade building process will commence to create an upgrade available in the upgrade manager of the user interface. The upgrade make take a while to generate and has the following naming: [Date of merge yyyy.mm.dd].[resolved issue number] “Issue description” (e.g. 2021.08.12.6699 Predicted-observed graphs not displaying).