Science contributions
Documentation
- Documentation is automatically generated from the submitted validation .apsimx file.
- A science document may also be submitted by the model author (e.g. see AgPasture science document).
- All equations shall have units on all variables.
Examples
- Good examples are important in showing the user different ways of configuring and parameterising the model.
- A single example file must be submitted by the model author. When it makes sense to do so it should contain:
- A short memo describing the model and example
- A simple simulation with good manager scripts that show a typical usage of the model. The report model should show the main outputs from the model. The example should also have one or more graphs showing model outputs.
- Additional simulations or experiments should be added that show the model in typical usage scenarios. These may include:
- a plant model in rotation with another plant model.
- a plant model that is intercropped with another plant model.
- a plant model being consumed by a plant consumer. This could be stock, a pest / disease or by using the SimpleGrazing model.
Validation tests
Model submissions will provide evidence that the model works. This is normally done via validation tests that show predicted with observed data, along with validation statistics. The validation tests need to be accompanied by memo text that describe the experiment and treatments. The validation .apsimx file is also converted to HTML via auto documentation.
Sensibility tests
Sensibility tests will be provided to broaden the validation tests into other GxExM scenarios. This is particularly important when the validation is limited in its scope, in particular for GxExM situations that are thought to be important, but where there is no data. Sensibility tests need to be accompanied by memo text that describes what the sensibility plots show and why the results ‘make sense’.
Move a model to release
Once a model has been approved by the APSIM Initiative it can be moved into the release.
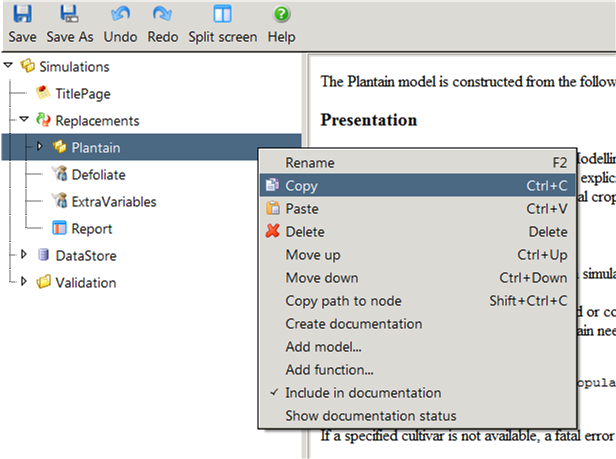
- Copy the plant model node from the Replacements node in the prototype simulation
- Paste this into a text editor and save as a json file into ApsimX\Models\Resources folder.
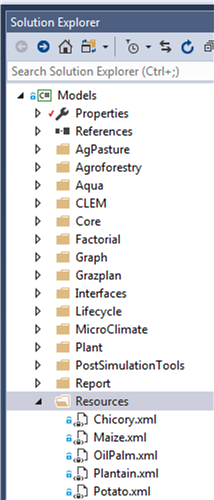
- Add the new file into the APSIMX solution. In VisualStudio, use the Solution Explorer tab
to locate Model\Resources in the Models project, right-click on Resources to open a pop-up menu,
select Add>Existing Item. Navigate to the folder where the newly created json file was saved,
select it and click Add. The file should now appear under Model\Resources.
- Locate it and right-click, select properties and change Build Action to ‘None’.
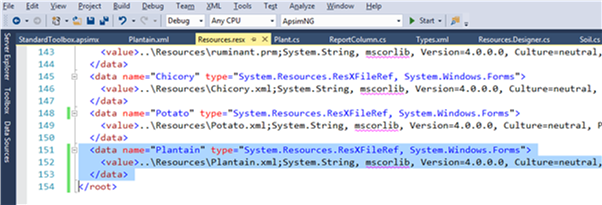
- Add a reference to the model as an Apsim resource. For this, open the Resources.resx file
(locate under Model/Properties). Copy a node from a similar existing model and change the name
and value to match the new model. Note that this is case sensitive.
- Add icons for the model. For this, create png images, with the same name as the model, and save in ApsimNG\Resources\LargeImages (32pixels) and ApsimNG\Resources\TreeViewImages (16 pixels). These should be added to the solution (as per step 3 and 4 above). After adding the images, locate them in Solution Explorer, right click on each, select properties and change Build Action to ‘Embedded Resource’.
- Add an example simulation to Examples folder.
- Copy the prototype simulation from the Prototype folder into its own folder in ApsimX\Tests\Validation. In this simulation, delete the model node in Replacements.
- Delete the model’s simulation and folder from the Prototypes folder
- Commit all, and create a Pull Request to have all these changes merged into the APSIM repository.